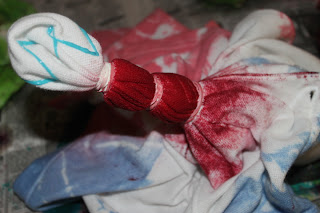
We started on the 3rd, so we'd have some festive shirts for the 4th. We grabbed our white clothes and got to work with the rubber bands. This works really well on any white clothing that has gotten stained recently. You dye over the stains, so no one would ever know, and you dont have to throw away a beloved shirt because of a messy meal! There are some really great tutorials on how to make different designs out there, accordian, sunburst, swirls, etc. Just make sure to tighten the rubber bands as much as you can or else the dye will seep into the fabric underneath and you will get a big splotch instead of a calculated design.
This year we used bottles for our dye. You can use a big bucket or multiple buckets if you are using different colors. RIT dye works great for this. You put the dye in the bucket, put the correct amount of water, mix and then dunk your shirts. The longer the shirt sits in the dye, the darker/brighter the color is at the end. A short, quick dunk will make a pastel shirt. The bottles make it easy to just dye a small area if you are trying to make a specific design, which is what we were going for this year.
We ended up finding a tie dye kit last year on clearance, and bought a few, so we used that. It included 5 colors, rubber bands, 5 bottles and gloves.
We also used glow in the dark puffy paint pens that I found at TJ Maxx. I used them on three shirts. A blue star for my Capt. America fan, a pink heart for my little princess and a pink anchor for my baby. I figured when the kids head to cosmic bowling later this summer, the glow in the dark on their shirts would look very cool.
We strategically wrapped each of our items with the rubber bands and went to work. I used the bottles to squirt each color exactly where I wanted it.
You can see the puffy paint star on this one. We were aiming for a red and white circular target look on my son's shirt, hoping it would look like Captain America's shield!
We covered the counters with newspaper (numerous layers) and put each item down on the paper as I squirted dye onto the clothing. This is what it looked like when I was done with the coloring process.
After we used up all the dye, We put our items seperately into plastic bags and tied each one up so they could set overnight. In the morning I untied each bag, took the rubber bands off of each one, making sure to remove EVERY rubber band, and washed the clothes in a cold wash with NO detergent. Then I dried them on a gentle cycle. The colors came out vibrant and the designs are awesome! Here are a few of our items!!
My daughter made a shirt, a pair of shorts and she also has a skirt.
My baby has a couple of new onesies! (This is awesome for stained baby clothes.... you'd never know they had food dribble on them!)
And here is the end result of my son's Captain America shirt. Very cool!!! He made a couple of other shirts, too. The dye kits have enough dye for a LOT of clothes! I even made a pretty bland floral bathrobe into a tie dye bathrobe. You can also tie dye towels and other fabric. And if you use the squirt bottles, you could design white canvas shoes, too. We have drawn designs and letters, even names with our squirt bottles. I like using them better than the dunk technique. Look for more tie dye creations from us in the future. We have so much fun with it!!


1 comment:
Very cool!!
Post a Comment